Friday, March 30, 2012

Prosciutto Wrapped Asparagus

This is one of my favorite ways to eat Asparagus. I made this in class for my final practical in lab and my teacher liked it as well as my classmates. My wife and I made this last night so I can show you how to prepare it. The Neufchatel Cheese gives it a creamy and tangy taste. It will leave you wanting more!

Prosciutto Wrapped Asparagus
Makes 8


Ingredients

  • 1 lb. Fresh Asparagus 
  • 8 oz. Neufchatel Cheese at Room Temperature (Found right next to the Cream Cheese)
  • 8 Slices of Prosciutto (I buy mine at the Deli and have them slice it fresh for me. You can get it a little thicker which will make spreading the cheese easier.
  • Olive oil for drizzling
  • Black Pepper
Note: I had a little extra asparagus left over, so we ate it. You could get more Prosciutto and probably get a couple more out of it. One way to see how much Prosciutto you need, just count the asparagus at the store and divide by 3 or 4. I only used a half a block of cheese so you won't need more.

Directions
     1.  Preheat oven to 450.
     2.  Wash the asparagus and trim off bottom ends about an inch.
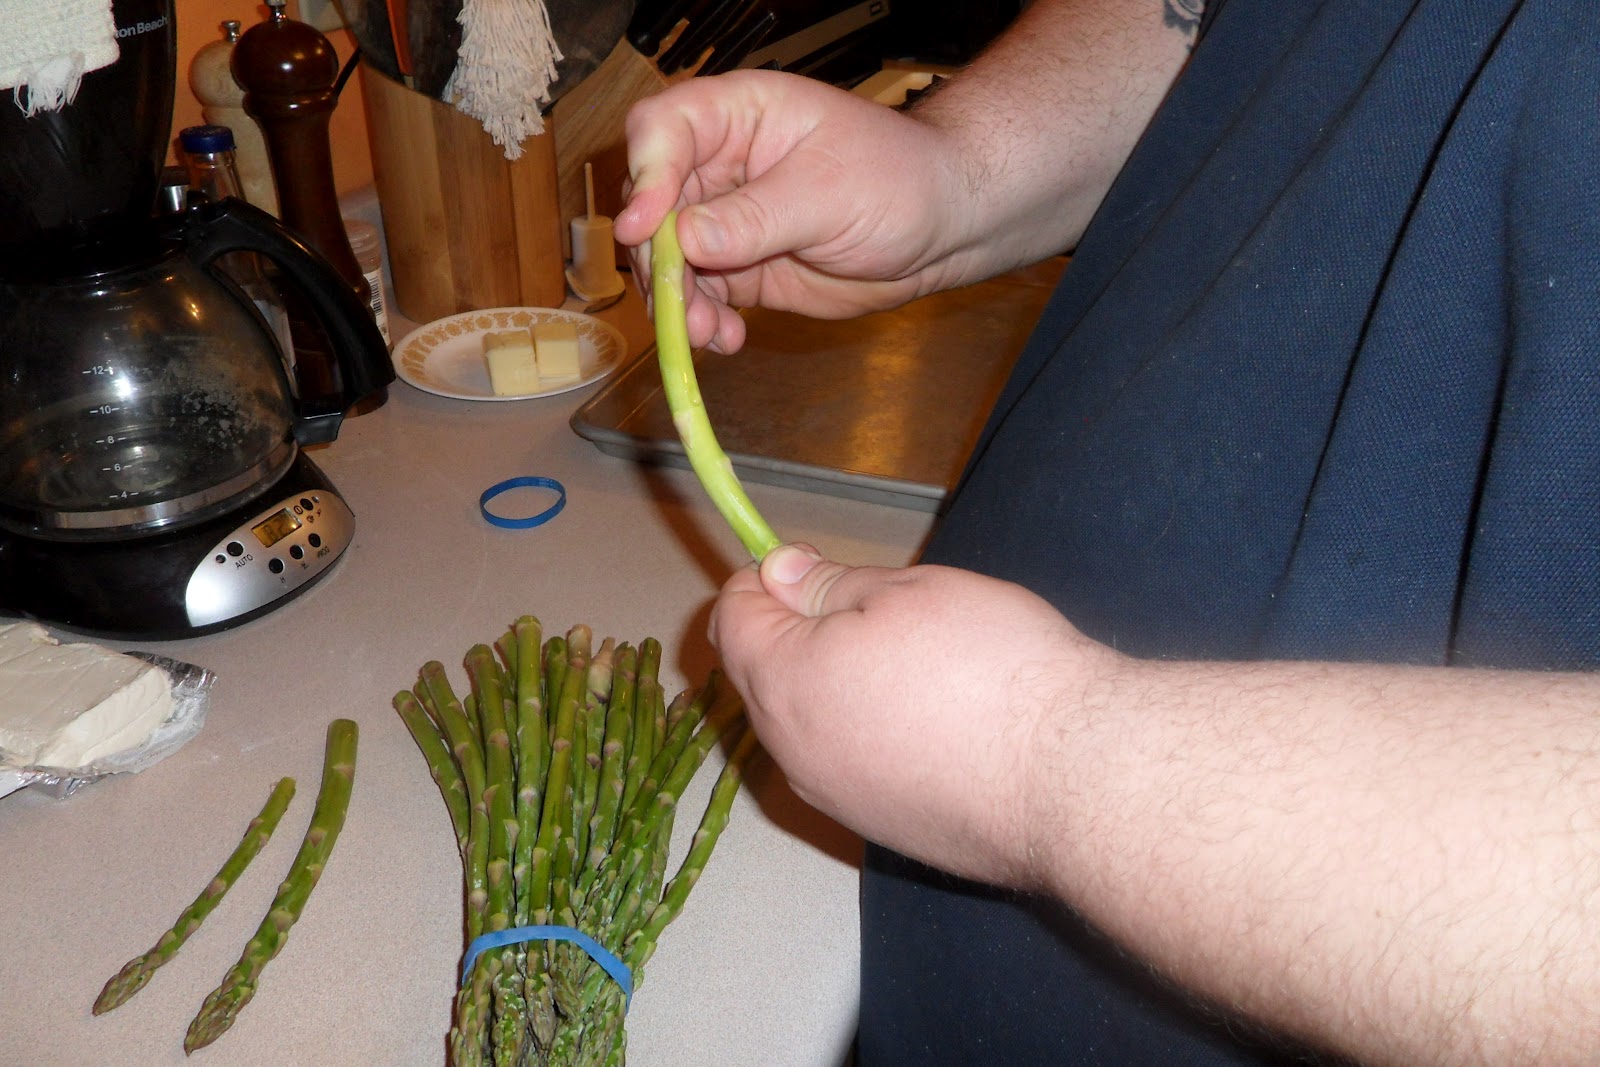
An easy way to know where to trim is by bending it and see where it snaps. 
     3.  In a large pot, bring some water to a boil. You will need enough to cover the asparagus. When water comes to a rolling boil, add asparagus and cook for 3 minutes. You want them just starting to get tender. They will cook in the oven a little longer. Pull them out of the water, rinse with cold water, and drain on paper towel or in colander.

     4.  Lay out the Prosciutto and spread Neufchatel over it.
Be careful not to tear the Prosciutto. The cheese will ooze out if you do.
     5.  Place 3 or 4 Asparagus Spears on a slight angle on top of the cheese.
Start out toward top of spear on an angle.

Roll all the way to the end.

     6.  Drizzle a little Olive oil on your baking sheet so they don't stick, then place your wrapped asparagus on it. Drizzle some more Olive Oil over the asparagus and add just a little black pepper.

      7.  Place in oven and bake for 10 minutes.
You want to bake it just until the Prosciutto starts to crisp up and the cheese is just about to ooze out. 

Done and ready to serve

We had ours as a side with my Smoked Gouda Chicken Cordon Bleu.


For my next Blog post, I will give you the recipe for my Smoked Gouda Chicken Cordon Bleu! So keep your eyes peeled! And as always, let me know what you think.


Monday, March 26, 2012

Cheesy Pesto Orzo with Mushrooms, Tomatoes, and Zucchini

I had such a taste for Pesto, and while at work the other night, saw a jar on sale. So I bought it and couldn't figure out what I wanted. Tonight for dinner, I tried out the new Fresh Takes by Kraft. I will review that in another post. I wanted to create a side dish to go along with it. Here's what I came up with.

Cheesy Pesto Orzo with Mushrooms, Tomato, Zucchini.


Serves 8


Ingredients

  • 1 Tbs Olive Oil
  • 1 Small Onion
  • 1 Clove Garlic
  • 1 Small Zucchini
  • 4 oz. White Mushrooms
  • 14.5 oz. Can Petite Diced Tomatoes
  • 8 oz. Orzo Pasta
  • Splash White Wine
  • 1 Cup Italian Blend Shredded Cheese
  • Pinch Salt and Pepper
  • 4 oz. Basil Pesto
Directions
  1. Bring water to boil in a Medium Pot. Add Orzo. Cook to package directions. Drain.
  2. Small dice the Zucchini and Mushrooms and set aside.
  3. Place Saute Pan over Medium heat. Add Olive Oil.
  4. Finely dice Onion and add to pan. 
  5. While onion is sauteing, mince garlic and add to pan. Be careful not to burn garlic.
  6. Add Mushrooms, Zucchini, and Splash of White Wine.
  7. Saute until tender.
  8. Add can of Petite Diced Tomatoes and bring to simmer. 
  9. Add cooked Orzo to mixture.
  10. Add Pesto and Cheese. Mix until incorporated.
Notes
  • I like to add a Tablespoon or 2 of Pasta water while bringing to simmer. 
  • You can add more or less of the vegetables.
  • You can add more or less of the Pesto and Cheese, depending on your preference.
Added the onion

Added Zucchini and garlic

Added Mushrooms and wine

Added tomatoes and pasta water

Added Orzo and Pesto

Final product topped with cheese

You could probably make this a main dish by added cooked chicken. It turned out pretty good for making this up on a whim. Let me know if you like this! Check out all my other recipes.


Sunday, March 25, 2012

Jason's "I'll Change Your Mind" Brussels Sprouts

My wife never used to like Brussels Sprouts. I made them for her once and she went nuts over them. So I thought I'd share my recipe.

My first question is this. Do you like cabbage? Then how can you not like Brussels Sprouts? Most people try the frozen ones and then decide they don't like them. Here's some advice DON'T buy the frozen ones. Then aren't that good. Buy fresh ones! They are like sweet mini cabbages. I simmer them in Chicken Stock and then sautee them in butter and season them. Here's how I will change your mind about Brussels Sprouts:

Ingredients

  • 1 lb. Fresh Brussels Sprouts
  • Water (Enough to cover your Brussels Sprouts)
  • Chicken Bouillon Granules or Soup Base
  • 1 Tbls. Butter
  • Salt, Pepper, Garlic Powder, and Onion Powder
Directions
  1. Put water in your Saucepan or Saute Pan and place over high heat. You'll want just enough water to cover the Brussels Sprouts.
  2. Trim your Brussels Sprouts by cutting off the stem portion with paring knife. Remove any discolored or damaged leaves.
  3. When water comes to boil, add chicken bouillon. The amount depends on how much water you used. (I usually use about 4 Cups of Water and about 2 Tbls. of Chicken Soup Base. You can also just use Chicken Stock.)
  4. Add the Brussels Sprouts to the water and reduce heat to a simmer. 
  5. Simmer for about 15-20 minutes or until just tender. (I usually take one out and cut it in half with a knife. You can tell when they are tender by cutting into them. If they aren't, throw the halves back in a wait a couple more minutes.)
  6. Drain and add back to pan. Add Butter and turn heat to medium. Dust with Salt, Pepper, Garlic Powder, and Onion Powder to taste. Don't add too much salt, as the Chicken Stock or Boullon has salt. You can always add more when eating.
  7. Toss them around to coat in the butter and to disperse seasoning. Saute for a 1-2 minutes.
  8. Enjoy! Congratulations, you now LOVE Brussels Sprouts!
Fresh Brussels Sprouts

Trimming the stem end

Cleaned and ready for cooking

Adding the soup base to the water

Getting ready to saute them

Tossing them in the butter and seasoning

Finished Brussels Sprouts
These are my favorite way to prepare Brussels Sprouts. If you prepare them this way, let me know what you think! Any feedback is gladly accepted! See you next time! Feel free to Share on Pinterest!


Smoked Gouda Mac-n-Cheese

Last night for dinner, we had some awesome Mac-n-Cheese. It wasn't my own creation, but I thought I'd post pictures and tell you about it. My wife found the recipe on Pinterest. Here is the direct link for the recipe, http://kitchencookoff.msn.com/articles/en-us/detail/all/32541567.

It uses your traditional Beschamel Sauce, rich and creamy, and some tasty Kielbasa. I made a few changes myself. Here are the changes I made:

  1. I used Elbow Macaroni instead of Shells.
  2. I didn't use breadcrumbs per wife's request.
  3. I used Smith's Kielbasa Links ( http://www.smithhotdogs.com/products/sausage_rings_and_more/), and cut them in small pieces.
  4. I shredded extra Gouda and put extra on top.
All in all, it turned out pretty tasty. Here are some pictures.


I cut the rind off before I shredded it.
Finished Product

Plated with Brussels Sprouts

Make sure you head over to the link to get the recipe! You will be glad you did. If you don't like Smoked Gouda, use regular or another cheese you like!

Tuesday, March 20, 2012

Veggie Update

As of right now, a couple people want the weekly veggie to be Zucchini. So based on that, I will be picking Zucchini this week! I already have a few ideas in mind. I will post recipes and ideas as I make them.

Keep sending me those requests and ideas!

I have a special challenge from my friend James. He hates radishes. So he challenged me to make them so he will like them. We will see what happens! It will either be the veggie next week, or I will just do this in addition to Zucchini.

Sunday, March 18, 2012

Weekly Vegetable Idea

Hello folks!

I have an idea! There is a realm of fresh produce out there and many people, including myself, need ideas on how to cook them. So here is what I want to do. Every Sunday, we will pick a vegetable. It can be as simple as a green bean or something you don't cook with often, such as a rutabaga. As long as it is something I can get my hands on, we will go with it. Once we have picked the vegetable, I will try to find or conjure up new recipes and ways to prepare them. Maybe there is a vegetable that you don't like. Maybe it will be a challenge to find a way you will like it. Whatever we do, we will learn together! We don't get enough vegetable in our diets so maybe with my idea, we can all experience natures bounties and not be so bored by them.

With that said, I need some ideas for our first vegetable. Comment at any time so we can see what we have to pick from. Next Sunday, we will choose one and then start thinking about the next. Then during next week, I will hopefully be posting some new and exciting recipes of that vegetable!

I get inspirations from people. My wife never liked Brussel Sprouts. So I grew them in the garden one year and decided to try some different methods and see what I can come up with. Low and behold, I discovered a way that she now LOVES Brussel Sprouts. So never knock something until you've tried it different ways. Be open to new possibilities and trying new things!

Can't wait to be inspired by your thoughts and comments!

Thursday, March 15, 2012

Sauteed Asparagus

Sauteed Asparagus Recipe from the last post....

Sauteed Asparagus
Ingredients:

  • 1 lb. Fresh Asparagus
  • 2 or 3 slices of Bacon
  • Salt
  • Pepper
  • Garlic Powder
  • Onion Powder


Directions:

  1. Wash Asparagus and cut off woody ends. Cut spears in half. 
  2. In a Medium Saucepan, fill 2/3 of the way with water and bring to boil. Simmer the asparagus until tender. Remove Asparagus and drain.
  3. In a large nonstick skillet, render the fat from the bacon. Remove the bacon and set aside. 
  4. Add Asparagus the skillet. Toss to coat.
  5. Add Salt, Pepper, Garlic Powder, and Onion Powder to taste. Toss a couple more times. 
  6. Remove from heat and serve.

Philly Cheesesteak Sammiches

Tonight for dinner, we had a taste for something like a Philly Cheesesteak. No, I've never been to Philadelphia and I know that what we had tonight was probably not "authentic" but it sure was tasty and I thought I'd share it. We had sauteed asparagus as a side and I will show that as well. I made these 2 recipes up tonight on a whim and it was a success.

Tonight's dinner- Philly Cheesesteak Sammiches and Sauteed Asparagus

Close up of the Sammich.
For the Recipe:


Jason's Cheesesteak Sammiches


(Makes 2 Large Sammiches)


1 Medium Green Pepper
1 Medium Onion
8 oz. Cremini Mushrooms
1 lb. Flank Steak
4 slices Provolone Cheese (or Monterey Jack is better)
2 Mini Ciabatta Loaves
1/2 tsp. Dried Oregano OR 1 tsp. Fresh Oregano
1/2 Tbls. Olive Oil
1 Tbls. Butter
Salt, Pepper, and Garlic Powder to taste.

Directions:

1. Slice Flank Steak in as thin as you can or would prefer across the grain and place in a zip top bag. Season with salt, pepper, garlic powder. Seal bag and set in refrigerator until next step is done.

2. Slice Pepper, Onion, and Mushrooms in 1/8"-1/4" strips. In a large skillet over medium-high heat, coat bottom with the Olive Oil and saute Peppers and Onions until a little caramelized. Add the Mushrooms to the pan and saute until soft. Remove Onions, Peppers, and Mushrooms and set aside in a bowl.

3. Return pan to medium-high heat and add butter. When butter is melted and pan is nice and hot, add Flank Steak. Season with Oregano. Saute until browned. Remove from heat.

4. Turn on Broiler. Cut Ciabatta loaves in half and place tops and bottoms on a cookie sheet. Spoon Flank Steak on bottoms. Then the Onion, Pepper, and Mushroom mixture on top of Flank Steak. Top with 2 slices of Provolone Cheese. Or more if you want it cheesier. Place under broiler until cheese is melted and bubbly and top is toasted. I added a drizzle of olive oil to the tops, just because.

5. Remove from broiler and place top on Sammich and eat!

Notes:
When choosing flank steak, get the highest grade you can find or afford. I use Certified Angus Choice which is a higher grade. Higher grade means more flavor and more tender. Also, make sure you cut the flank thin and ACROSS the grain. If you cut it too thick, it can get chewy!
Also, Monterey Jack is super tasty but you have to buy it in a block unless your local deli has it sliced. Mine does not, so we used Provolone.
The Mini Ciabatta loaves were probably 3"x6". If you can't find smaller ones, use one bigger one and cut into portions.


Pin It


Tuesday, March 13, 2012

Bacon is Complete!

Today, I took out the bacon from the fridge, rinsed it off, patted it dry, and placed on a cookie sheet in the oven set at 200 degrees. Let it sit in there for just over 90 minutes. Took it out and let it cool. We couldn't wait and sliced off a few slices and fried it up! I was pleasantly surprised, IT TASTED JUST LIKE BACON!!! It has a slight sweetness from the brown sugar. Just the right amount of salt. the only thing that I was unhappy with was when I grabbed the thyme to add to the cure, I accidentally grabbed oregano and didn't realize it until I had a little bit in it. But other than that, it was AWESOME! I can't wait to experiment and see what flavors I can create.

 Fresh out of the oven.


 After we fried it up.
Next time I make bacon, I will make sure the smoker isn't buried in the shed and smoke it. Maybe some Hickory or even Applewood would give it a great taste.

Garlic is growing strong!

Went out to check on the garlic this morning. I counted 69 garlic shooting through the ground! I took a couple pictures to show you!


When it's ready for harvest, I am going to keep some fresh. Most of it will probably get minced with olive oil, placed in small containers, and frozen for later use. This way we can take out a little at a time and use it all year long. The last of it will get replanted for next year!

When I was helping in the kitchen at the Lake View Country Club, they would take all their fresh garlic and run it through the processor with olive oil and then freeze it in small containers. This way they could take out a container and put it in the fridge to thaw and then cook with it. It lasts longer, stays fresher, and saves both time and money. 

Monday, March 12, 2012

Onions Sprouted!

So today, I checked on our onions we started from seed. And to my surprise, most of the Bunching Onions are sprouted and the Bianca di Maggio are starting as well! Soon we will be starting the tomatoes, peppers, and tomatillos.

 It's a little hard to see them but there are baby onions!

Again, it's a little hard to see but they are there....

Tomorrow, the curing process of  our home-made bacon will be complete. Then in the oven it goes to finish off! So look for that in tomorrow's blog! See you then!

Friday, March 9, 2012

Onions Started!

This past Tuesday, I started 2 different kinds of onions from seed. I should have started them sooner but was unable to because of school and other commitments. If they all come up, we will have 36 Bunching onions and 36 Bianca di Maggio onions. I got a good portion of my seeds this year from Baker Creek Heirloom Seed Company, www.rareseeds.com, which is a wonderful place for seeds. I will post pictures of my seeds this year and keep you updated!

Tuesday, March 6, 2012

Home-Made Bacon continued....

Today after class, I decided to start my home-made bacon. 5 lbs of pork belly from work. 

Here is the Pork Belly. 5 lbs. only cost a little over $16.

 This is after the cure was "rubbed" all over the Pork.

 Close-up shot of the cure.

Close-up of the end. Looks almost like bacon already!

So far, it's been SUPER easy to make. It has to set for 7 days. So we will not know the final results until next Tuesday. Halfway through the week, I will "rub" the pork again to redistribute the cure. And when it's done, I will put more pictures up and let you know how it turned out. If you want to check out the recipe, you can go to http://ruhlman.com/2010/10/home-cured-bacon-2/

Monday, March 5, 2012

Home-made Bacon

Today I got my Pink Curing Salt in the mail! I'm so excited! I also bought 5lbs of Fresh Pork Belly. Tomorrow, I will be starting the week long process of curing my own homemade bacon! Well, I can't say my own. I am going to be using the recipe given by Michael Ruhlman on his website at http://ruhlman.com/2010/10/home-cured-bacon-2/ . He is the author of a couple of the books that I want. The one I really want is:

Charcuterie: The Craft of Salting, Smoking and Curing

Now, I'm sure that I will alter the recipe a teeny little bit to my own liking but this is definitely some new and uncharted territory. If you want to share my journey, I will be posting pictures as I go so we can learn this together! I just couldn't wait until Garde Manger in the fall at school. I had to dabble in this a little before I learned how in class. 

Sunday, March 4, 2012

First Blog and Gardening

Ok, so today I have hopefully figured out how to get this thing going! I'm sure I will learn as I go, so please bear with me if things get a little screwy.

I've been pretty busy planning this year's garden. I recently purchased and received some seeds through the mail. I will be trying out San Marzano tomatoes this year. We juice and can most of the tomatoes we grow and turn the juice into sauce later on. So this year, I thought why waste time and jars when I can just can the finished product. I also decided to grow some very different veggies this year.
Here's this year's list:

Veggies

  1. San Marzano Tomatoes
  2. Poblano Peppers
  3. Green Peppers
  4. Jalapeno Peppers
  5. Pimiento Peppers (Going to try to make my own Paprika)
  6. Yardlong Beans
  7. Lunar White Carrots
  8. Delikatesse Cucumbers (For Pickles)
  9. Okra
  10. Zucchini
  11. Beets
  12. Michihli Cabbage
  13. Bianca di Maggio Onions
  14. He Shi Ko Bunching Onions
  15. Snow Peas
  16. Tomatillos
  17. Eggplant

Fruit

  1. Banana Melon
  2. Watermelon
Herbs

  1. Fennel
  2. Basil
  3. Oregano
  4. Dill
  5. Parsley
  6. Cumin
  7. Tarragon
  8. Rosemary
And lastly, something totally different.... POPCORN!
We will see how all this goes. I have to build some raised beds and start some of my seeds. Some later too.