Wednesday, October 3, 2012

Avocado Mac 'n' Cheese

My wife LOVES avocados and she found a recipe for Avocado Mac 'n' Cheese. So we gave it a try. Here are the results!

The recipe can be found at http://www.twopeasandtheirpod.com/stovetop-avocado-mac-and-cheese/.
I followed the recipe exactly except I used Dry Radiatore for the pasta and Heavy Cream for the Milk. It's a very rich and tasty meal!

I found that it made more like 8 Servings using the Radiatore. And it was very "saucy".


Grated Pepper Jack Cheese
Avocado

Avocado, Cilantro, Garlic, Lime Juice, and S&P.

All processed.....

Made a roux and added cream....

......then the cheese!

Mix everything together.

Voila!

Plated with Spinach and Giant Eagle's Red Wine and Garlic Chicken Sausage.
This Mac 'n' Cheese was one of the richest I've had in a long time. But it was pretty good! I will probably make it again. If you like this recipe, make sure you head over to www.twopeasandtheirpod.com and see what other recipes they have! Oh, and as always, please comment on any of my blog posts!

Monday, September 24, 2012

Banana Melon

So, I finally had a ripe Banana Melon in the garden. This is the first time I have ever grown them. I purchased the seeds from my favorite seed company, Baker Heirloom Seed Company.

This is how they describe it on their website:
     90 days. Banana-shaped fruit, smooth yellow skin and sweet, spicy salmon flesh. 16-24 inches long, 5-8 lbs. It was listed in 1885 by J. H. Gregory’s Catalogue, which said, “When ripe it reminds one of a large, overgrown banana... It smells like one, having a remarkably powerful and delicious fragrance.” This is one of my all- time favorites, being very sweet and great for specialty markets. 


The first one was a small one, 3.668 lbs.

Me holding the Banana Melon.

Cut into the melon.
It tastes a lot like cantaloupe and is very sweet and juicy.

Sunday, September 16, 2012

Let Your Garden Make You Dinner Tonight!

I know that fall is just about here and most gardening is coming towards the end of the season. But I wanted to share something about gardening. I want to encourage everyone to start thinking about next year's garden and what you are going to grow. I always have my basics.. Tomatoes, Onions, Eggplant, Zucchini, etc. That is a given. But think about trying a couple new veggies. Maybe plant a couple things you've either never had or something you've never thought about growing. Just plant a couple and see how it turns out. Sometimes you stumble upon something you love and just never thought to try. Over the years I have planted many different crops and some I love and still plant, others I will probably never plant again.

I remember planting Kidney Beans one year. It was interesting. I learned a ton of facts about them because I tried to grow them. They turned out great. One fact I did not know... Kidney Beans, if not cooked all the way, will make you ill. They contain a toxin that is present until fully cooked. Even partially cooked will make you sick. They were great but they were just too much work and hassle to harvest and store. It is well worth the cheap price at the supermarket to buy them rather than do all that work. But it was rewarding to be able to say, "I grew the beans in this Chili!!".

Other plants, I cannot wait to grow again. I found these carrots one year that had 4 different colors/varieties in it. I figured, what the heck. The white ones were SO sweet and absolutely amazing! I ended up buying that particular variety for the garden this year!

But the ultimate reward from gardening is to be able to, at a moment's notice, go out and pick something for dinner. Tonight was a great example. You don't always need a recipe to make something great. Just use what you have on hand and let your garden inspire whatever comes to mind. We took a Chicken Breast out of the freezer before I left for work, but didn't have any idea what we would do with it. So at work, I thought, how about a Lemon Chicken Pasta. So I marinated the chicken in olive oil, lemon juice, salt, pepper, and oregano. I went out in the garden and picked an Eggplant, and a handful of grape tomatoes. So I sauteed the eggplant, a shallot, and then the chicken. Tossed in some white wine, and pasta water. Then tomatoes, cut in half. And I found some feta in the fridge. Threw in the Penne and voila! I had created a sort of Greek Lemon Chicken Pasta. I let the garden tell me what was for dinner! Didn't have to go out and buy all kinds of ingredients.

Moral of this blog... You don't always need a recipe to create a great dinner. Just use your imagination and whatever you have in your garden. Have fun with it and don't be afraid to try something different. If it tastes bad, you can always call a delivery place and get dinner. But at least you tried!

Thursday, August 23, 2012

Grilled Swordfish Steaks with Basil Caper Butter

Ok everyone, here is the recipe I will be using when I grill this up for you at the Harborcreek Giant Eagle on 8/23/12 and 8/25/12!

This a very good recipe I found for grilling Swordfish Steaks. Remember to buy only FRESH Swordfish. No frozen, unless that's all you can get your hands on. The fresh is a million times better. That goes for all seafood. This recipe takes about 20 minutes to prep and about 8-10 minutes of actual cooking time. It's a very quick recipe that is good on a weeknight or weekend.


Grilled Swordfish with Basil Caper Butter
Serves 2
3 Tbls Unsalted Butter
1 Tbls Chopped Basil
1 tsp Drained capers, chopped
1 Tbls plus 1/2 tsp  Fresh Lemon Juice, divided
Salt and Pepper
1 Tbls Extra Virgin Olive Oil
2 8oz Swordfish Steaks cut 1” thick

            In a small bowl, blend the butter with the basil, capers and 1/2 teaspoon of the lemon juice. Season with salt and pepper, and refrigerate.
In a large, shallow dish, mix the olive oil with the remaining 1 1/2 teaspoons of lemon juice. Season the swordfish with salt and pepper and turn the fish in the olive oil mixture. Refrigerate for 15 minutes.
Grill the swordfish steaks over high heat until nicely charred on the outside and just cooked within, about 4 minutes per side. Transfer the steaks to plates, top each with a dollop of basil-caper butter and serve right away.

This recipe is not my own. It is from Food & Wine Magazine.

Grilled Swordfish Steak served with Exotic Mushroom Risotto and Sauteed Summer Veggies.

Friday, August 10, 2012

Summer Salsa Lime Chicken

So here is the story behind this dish.

While dining at a restaurant, that I shall not mention, they have a dish called Fiesta Lime Chicken. It was good but not great. After making a huge batch of my Summer Salsa, I had an idea that later became this dish. It isn't that close to the restaurant dish, but was inspired by it. Over the past 4 or 5 times I've made it, little tweaks have made it into what it is now!

When making this dish, you HAVE to make it with my Summer Salsa. If you use jarred, it will taste not so well. You can find the Summer Salsa recipe on another post.

Summer Salsa Lime Chicken
Serves 2
Prep Time: 20 Min
Cook Time: 15 Min

Ingredients
For the marinade

  • 2 Tbls Olive Oil
  • Juice from 1 Lime
  • Zest from 1 Lime
  • 1 Clove of Garlic
  • Salt and Pepper
Rest of Ingredients
  • 2 Boneless Skinless Chicken Breasts
  • Shredded Colby Jack Cheese
  • Handful of Tortilla Chips, crushed.
  • Lime wedge
  • Summer Salsa (On other post)
Directions
  1. Whisk together all marinade ingredients and set aside.
  2. Pound Chicken thin to about 3/8" thick. Coat with marinade and place in refrigerator for 15 miutes.
  3. Heat grill to medium high heat. Grill chicken for 4-5 minutes on each side until no longer pink. 
  4. When chicken is done, place mound of shredded cheese on top and close lid or cover.
  5. While cheese is melting, crush a handful of tortilla chips to make a bed for the chicken to sit on.
  6. Once cheese is melted, place chicken on bed of crushed tortilla chips.
  7. Top with mound of Summer Salsa.
  8. Sprinkle chips, chicken, and Salsa with lime juice and garnish with Lime Slice.

Garlic and Lime Zest for Marinade
Marinade

Pounding out chicken.

Marinating Chicken
Grilling the chicken
Grilling the chicken on the Induction Cooktop.
Adding the cheese to the chicken.


Cover Chicken to melt cheese.


Finished dish. Served with Sauteed Zucchini and Mexican Rice.

I didn't list amounts of ingredients for the chicken because it all depends on the size of the chicken. I cover the chicken completely with cheese. Same with the salsa and the bed of tortilla chips.

Also, if you can think of a better name for this dish, let me know. I am open to suggestions.


Monday, July 16, 2012

Exotic Mushroom Risotto


If you are looking for a great side dish for a "meaty" dish, how about a risotto? Risotto can be a little time consuming but it's worth every minute of it. It's very versatile. You can add almost anything to it to change the flavor. The other day, my cousin came to visit and we made Swordfish Steaks (will be another blog post later) and he never had risotto. So we planned on that. While in the store, I saw an Exotic Mushroom Blend in the mushroom section and decided we would make Exotic Mushroom Risotto! Risotto will usually take about 20 minutes to make and you only add a little stock at a time. So it does require a little attention. But for ingredients, you can change them to your liking or what you have in the garden.


Exotic Mushroom Risotto
Serves 8
Prep Time: 5 min
Cook Time: 25 min

Ingredients:

  • 3 Tbls Butter
  • 1 Medium Shallot, chopped
  • 1 1/2 C Arborio Rice
  • 8 oz Exotic Mushroom Blend (or any kind you like)
  • 1/2 C White Wine
  • 4 C Chicken Stock
Directions:
  1. In a large saucepan, over medium heat, melt the butter.
  2. Add Shallots, saute stirring frequently until they become transluscent.
  3. Add Arborio Rice, stir frequently for a few minutes. Don't let rice brown. It will turn a different shade of white.
  4. Add Mushrooms, then White Wine.Reduce heat to a simmer.
  5. When wine is mostly absorbed with the wine, add Chicken Stock a ladle at a time, letting the stock absorb into the rice between ladles. 
  6. Once the last of the stock is added, taste to see if rice is tender. Once Stock is just about absorbed, add salt and pepper to taste and serve. Rice should be a little creamy. 
For a video of this process, check out my Youtube Video


Monday, June 25, 2012

Smoking Ribs and Pork Shoulder

The other day, my 86 year old grandfather, and my father, came out for a Father's Day feast! They wanted my Smoked Pork Spareribs and Smoked Pork Shoulder. So I figured I would take a few pictures and give everyone else some tips and tricks on smoking some mouthwatering food!

People argue all the time about whether to use Barbecue Sauce or not. I personally don't when I use my own home-made rub. Now, I give out a lot of recipes, but my "Wimpy's BBQ Rub" is one that I keep locked away in a vault. Sorry, I just won't. But I will show you how I make ribs and shoulder.


Secret Rub 

Secret Rub


Finished Secret "Wimpy's BBQ Rub"
I like Spareribs because they have a lot of meat on them and the price. They are cheaper than back ribs. When you get them, they will have a little flap on the back of the rack. I cut that off (See picture below) and keep it as it turns into a tasty little snack about halfway through!
Removing the little "flap" on the back of the Spareribs.
Also, on the back, is a translucent skin that if possible, needs to come off. No matter how long you cook that, it will never be edible. Also, the smoke can't penetrate the meat if you leave it on. The trick is to get under it in a corner and try to peel it off. It is very slippery and sometimes a paper towel helps with grip. At any rate, try your best to get it off.
This is the silver skin you want to remove.
Just before you coat the ribs or shoulder with rub, cover it in plain old yellow mustard. It will help the rub stick to the eat a lot better and once cooked, you won't even taste the mustard.
Rubbing on the mustard.

Rubbing in the Rub.
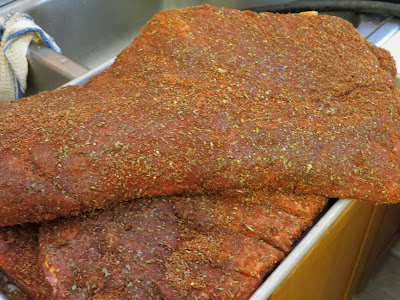
Be very liberal with the rub and make sure every square inch, nook, and cranny is covered with it.
How it should look when done rubbing.

They are going to have a nice bark.
You can use a variety of wood to smoke with. My dad happened to have Apple so that is what I used this time. Others that are good with pork are Oak and Cherry.
This is the Apple branches we chopped and soaked.
If you've never used a chimney starter, you don't know what you are missing! This will give you red hot coals in about 10 minutes. All you do is stuff about 2 pieces of newspaper in the bottom, fill the top with lump charcoal, and light the newspaper. It's that easy!
Getting the Chimney ready.
Putting the ribs and shoulder on the smoker.
For pork, try and keep the temperature in the smoker at 225*F. Both the ribs and the shoulder will smoke for about 6 hours. If you have a digital thermometer that is oven safe, place it in the shoulder, without touching bone, and smoke it until it reaches 200*F. Then let it sit, covered, for about 30 minutes and then shred.
3 Racks of Ribs and 2 Shoulders.
I like to mist with Apple Juice every so often while smoking. Adds flavor and moisture.
Misting with Apple Juice.

Showing the smoke.

Almost done.
Remember to let the ribs sit for about 10-15 minutes after you pull them off the smoker. If you cut right into them, the juice will just run out and they will become dry.
The finished Ribs.
The Pinkish color around the outside perimeter of the meat is called the "Smoke Ring".
Finished Pork Shoulder.
So yummy!

One shoulder was shredded for Pulled Pork.

This is really just a basic intro to the world of Smoking. If you want to learn more, let me know. All in all, everything turned out pretty tasty.