Monday, June 25, 2012

Smoking Ribs and Pork Shoulder

The other day, my 86 year old grandfather, and my father, came out for a Father's Day feast! They wanted my Smoked Pork Spareribs and Smoked Pork Shoulder. So I figured I would take a few pictures and give everyone else some tips and tricks on smoking some mouthwatering food!

People argue all the time about whether to use Barbecue Sauce or not. I personally don't when I use my own home-made rub. Now, I give out a lot of recipes, but my "Wimpy's BBQ Rub" is one that I keep locked away in a vault. Sorry, I just won't. But I will show you how I make ribs and shoulder.


Secret Rub 

Secret Rub


Finished Secret "Wimpy's BBQ Rub"
I like Spareribs because they have a lot of meat on them and the price. They are cheaper than back ribs. When you get them, they will have a little flap on the back of the rack. I cut that off (See picture below) and keep it as it turns into a tasty little snack about halfway through!
Removing the little "flap" on the back of the Spareribs.
Also, on the back, is a translucent skin that if possible, needs to come off. No matter how long you cook that, it will never be edible. Also, the smoke can't penetrate the meat if you leave it on. The trick is to get under it in a corner and try to peel it off. It is very slippery and sometimes a paper towel helps with grip. At any rate, try your best to get it off.
This is the silver skin you want to remove.
Just before you coat the ribs or shoulder with rub, cover it in plain old yellow mustard. It will help the rub stick to the eat a lot better and once cooked, you won't even taste the mustard.
Rubbing on the mustard.

Rubbing in the Rub.
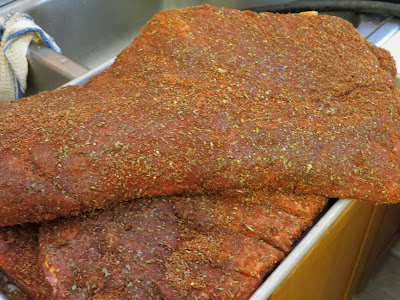
Be very liberal with the rub and make sure every square inch, nook, and cranny is covered with it.
How it should look when done rubbing.

They are going to have a nice bark.
You can use a variety of wood to smoke with. My dad happened to have Apple so that is what I used this time. Others that are good with pork are Oak and Cherry.
This is the Apple branches we chopped and soaked.
If you've never used a chimney starter, you don't know what you are missing! This will give you red hot coals in about 10 minutes. All you do is stuff about 2 pieces of newspaper in the bottom, fill the top with lump charcoal, and light the newspaper. It's that easy!
Getting the Chimney ready.
Putting the ribs and shoulder on the smoker.
For pork, try and keep the temperature in the smoker at 225*F. Both the ribs and the shoulder will smoke for about 6 hours. If you have a digital thermometer that is oven safe, place it in the shoulder, without touching bone, and smoke it until it reaches 200*F. Then let it sit, covered, for about 30 minutes and then shred.
3 Racks of Ribs and 2 Shoulders.
I like to mist with Apple Juice every so often while smoking. Adds flavor and moisture.
Misting with Apple Juice.

Showing the smoke.

Almost done.
Remember to let the ribs sit for about 10-15 minutes after you pull them off the smoker. If you cut right into them, the juice will just run out and they will become dry.
The finished Ribs.
The Pinkish color around the outside perimeter of the meat is called the "Smoke Ring".
Finished Pork Shoulder.
So yummy!

One shoulder was shredded for Pulled Pork.

This is really just a basic intro to the world of Smoking. If you want to learn more, let me know. All in all, everything turned out pretty tasty.


Sunday, May 6, 2012

Mexican Rice

Mexican Rice is a great side dish for anytime. Even better when making tacos! I adapted this recipe from one I found on www.allrecipes.com.

Mexican Rice
(Makes about 3 Cups)
Prep Time: 5 min
Cook Time: 20 min

Ingredients

  • 1 Cup Uncooked Long Grain Rice
  • 3 Tablespoons Canola or Vegetable Oil
  • 1 8oz Can of Ro-Tel Tomato Sauce
  • 1/4 Cup Onion, Small Dice
  • 1/4 Cup Green Pepper, Small Dice
  • 1 3/4 Cup Chicken Broth
  • 1 teaspoon Roasted Ground Cumin
  • 1 teaspoon Garlic Salt
  • Salt and Pepper to taste
Directions
  1. In a medium saucepan over high heat, add the Canola oil. Let oil get nice and hot. 
  2. Add rice. Stir frequently and try not to let it brown. 
  3. After about a minute, add onion and peppers. 
  4. The rice will eventually change from looking translucent to a very white. At this point, add the cumin and garlic salt, stirring constantly.
  5. When that is mixed in, add the tomato sauce and chicken broth. It will boil almost immediately. Stir, cover with lid, and turn heat to low to just simmering. 
  6. Simmer for 20 minutes or until all liquid is absorbed. 


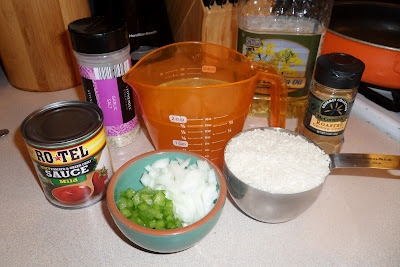
Here are the ingredients.


The rice before it's cooked in the oil.

It will get a white appearance and not be translucent.

The finished rice.
The method of cooking rice before you simmer it is called the pilaf method. You could use different ingredients and make regular rice pilaf or even change them up and make something totally different and unique. However you do it, it is still called the pilaf method.


Wednesday, May 2, 2012

Smoked Gouda Chicken Cordon Bleu

My wife's favorite cheese is Gouda. Especially Smoked Gouda! So when I wanted Chicken Cordon Bleu one night, using Smoked Gouda was our compromise. Needless to say, it turned out Amazing! Here is how I made it.

If you have a full service meat department at your local grocer or a butcher, get your chicken breast from them and have them run it through the "Cuber" or "Tenderizer" once. It will thin it out and make it nice and tender. If you don't have someone that can do that, you can either buy thin chicken breast or pound them out yourself with a meat mallet. Lucky for me, I work at a grocery store in the meat department that has such a machine.

Also, in the pictures, I show a large chunk of Smoked Gouda. As I found out in the end result, it was a little too large and didn't quite melt all the way. So when cutting the cheese, try not to use such a large chunk. Maybe about 1/4" thick. I went about 1/2". Plus, you don't want too much cheese. Smoked Gouda is a rather strong cheese and you don't want it to overpower your Chicken.

Smoked Gouda Chicken Cordon Bleu
(Serves 2)
Prep Time: 10 min
Cook Time: 20-30 min

Ingredients

  • 2 Large Boneless Skinless Chicken Breasts, ran through cuber (See note above.)
  • Smoked Gouda (How much depends on how cheesy you want it. See note above.)
  • 2 Thin Slices of Ham from the Deli (Again, your preference of Ham.)
  • Italian Style Panko Bread Crumbs for coating.
  • Olive Oil Spray


Directions

  1. Preheat oven to 375 degrees.
  2. Layout ham and place chunk of Gouda on one end.
  3. Fold ham around cheese to make a sort of "packet".
  4. Lay out chicken breast, silver side up. Silver side has a silvery look to it. Tender side should be on bottom. 
  5. Place ham and cheese "packet" on widest of chicken breast.
  6. Roll chicken around ham and cheese, tucking in sides as you go. See pictures for help.
  7. Spray Chicken and a cookie sheet with olive oil spray.
  8. Roll Chicken in bread crumbs and place on the cookie sheet.
  9. Bake for 20 minutes or until chicken is done and cheese is melted. Try not to overcook the chicken.


Start of ham and cheese "packet".


Ham and cheese "packet".


Placing the "packet" on the chicken.

Rolling the chicken around the "packet".

Spray this with olive oil spray for the bread crumbs to adhere.

Coating with bread crumbs.

Place on cookie sheet.

Cooked and ready to eat.


These are easy to make and are a great meal. I served it with my Prosciutto Wrapped Asparagus. That recipe is on here also! Please let me know how yours turned out.


Saturday, April 21, 2012

Braised Cuttlefish

This past holiday season, there was this interesting seafood item at work, that I just couldn't pass up. It was a whole frozen cuttlefish. I had never seen or even heard of this before. I asked one of my culinary teachers about it and he wasn't quite sure about it. Upon further investigating, finding a recipe was a little bit of a task as well. Finally, I found an interesting Greek recipe that sounded kind of good. So I figured, why not. Let's try this and see what happens. To make it more interesting, I made it at my parents' house during the holidays to share in this little culinary endeavor and get other peoples' thoughts.

I found the recipe at http://greekfood.about.com/od/fishentrees/r/soupieskrasates.htm and it's a Greek dish called Soupies Krasates. It's a Braised Cuttlefish Recipe and it was pretty tasty! 

Cuttlefish are cephalopods. They are somewhat similar in taste to octopus and squid. They have 8 arms and 2 tentacles and are highly intelligent. 

Cuttlefish in it's habitat.

Cleaned Cuttlefish.
Me with the Cuttlefish before I cut it up.
All finished. I can assure you that it tastes WAY better than it looks!

In closing, this is a very eccentric dish and I don't expect people to run out and try it. But it's an example of seeing something new and different and not being afraid to try it. I was a little intimidated at first but I am glad that I took on the challenge.


Sunday, April 15, 2012

Meat School

Since I work in the Meat Department, I get all kinds of questions on what kind of meat people should use for different applications. So I thought I would share a couple things with everyone. I will keep sharing more over time, but since we are approaching summer, I will start with grilling. I get asked all the time what steaks are the best for grilling. My answer is always the same. It depends on your preference. My number 1 absolute favorite steak is a Ribeye Delmonico. It's a boneless Rib Steak that has lots of marbling and packed with tons of flavor and juiciness!

Ribeye Delmonico


The best steaks for grilling are Rib Steaks, Strip Steaks, T-Bones, Porterhouse, Filet, and Top Sirloin. If you are watching your calories and fat, and you desire a lean steak, go with either a Filet or Top Sirloin. Both will stay tender even though they are lean. If you went with an Eye of Round or Round Steak, you would be eating shoe leather.

People often wonder what the difference is between T-Bones and Porterhouse. My answer.. Basically nothing. Both cuts are cut from the same sub-primal., the loin. They both are made up of a Strip Steak and a Filet, seperated by a T-Shaped bone. The difference between the two cuts is that as the butcher cuts steaks off, the Filet side gets bigger and the Strip side gets smaller. So Porterhouse has a big Filet, small Strip. The T-Bone has a small to almost no Filet, and a much bigger Strip.

T-Bone, notice the small Filet on the left side of the steak.
Porterhouse, Notice the larger Filet on the bottom of the steak. 

This is just barely scratching the surface of meat. Butchery is a fascinating subject and there is so much to know. If you have any questions or comments, please feel free to ask! 

Next lesson, grading beef.

Saturday, April 7, 2012

Last Minute Easter Ham Idea!

Every time I make a ham, this is what I do! It turns out tasty and makes some great juice to make ham gravy. My mom makes ham gravy and the holiday wouldn't be complete without it!

No matter what size ham, the method is still the same.

You will need:

  • Fully cooked Ham - It can be Boneless, Semi-Boneless, etc.
  • 1 Fresh Pineapple
  • Thick Cut Bacon - I prefer peppered bacon.
  • Brown Sugar
  • Pineapple Juice
  • Toothpicks
Method:
  1. Preheat your oven according to Ham's  package directions.
  2. Peel and Chunk your Pineapple. Set aside.
  3. Place ham in your pan. If it has a flatter side, try and keep it to the top.
  4. Score the top of ham with a knife 1/8" to 1/4" deep in a diamond pattern.
  5. Place Brown Sugar on top and as far down the sides that the sugar will stay on. I put on a nice thick layer.
  6. Take your bacon and drape over brown sugar all over the ham.
  7. Take your cubes of Pineapple and stab them with toothpicks and stick into ham. This will secure the bacon down and hold the layer of brown sugar onto the ham. 
  8. Pour Pineapple Juice into bottom of pan. You want enough Pineapple Juice in the bottom of your pan so it doesn't go dry.
  9. Cover your ham and cook according to package directions.
Note: If you want to add a little more brown sugar on top of the bacon, you can. I sometimes do. 

Most of the time, the bacon gets picked off before the ham is even eaten! It is almost like candied bacon!

This is right before ham goes in the oven!


Thursday, April 5, 2012

Boozy Chicken and Cauliflower Pizza Crust

I haven't been able to cook anything new up for you guys to try but I did make an AWESOME chicken dish today! I found a recipe for Boozy Chicken that has mushrooms, almonds, and an Amaretto Glaze. This is where I found the link: http://shabbottshabits.com/2011/boozy-chicken/. It was super tasty. The only thing I did different was add extra mushrooms. So if you want something different and delicious, take a look at that one. Sadly, I do not have a picture of this one. It didn't last long enough!

Another recipe I have tried, was a pizza crust made out of Cauliflower! Interesting and very good! Great if you are watching carbs. Check that out here: http://www.eat-drink-smile.com/2011/04/cauliflower-crust-pizza.html. Definitely a fork and knife kind of pizza.

I topped mine with Turkey Pepperoni, Prosciutto, and Mushrooms!


Both of these blogs have some great recipes so give them a look and enjoy!