Thursday, August 23, 2012

Grilled Swordfish Steaks with Basil Caper Butter

Ok everyone, here is the recipe I will be using when I grill this up for you at the Harborcreek Giant Eagle on 8/23/12 and 8/25/12!

This a very good recipe I found for grilling Swordfish Steaks. Remember to buy only FRESH Swordfish. No frozen, unless that's all you can get your hands on. The fresh is a million times better. That goes for all seafood. This recipe takes about 20 minutes to prep and about 8-10 minutes of actual cooking time. It's a very quick recipe that is good on a weeknight or weekend.


Grilled Swordfish with Basil Caper Butter
Serves 2
3 Tbls Unsalted Butter
1 Tbls Chopped Basil
1 tsp Drained capers, chopped
1 Tbls plus 1/2 tsp  Fresh Lemon Juice, divided
Salt and Pepper
1 Tbls Extra Virgin Olive Oil
2 8oz Swordfish Steaks cut 1” thick

            In a small bowl, blend the butter with the basil, capers and 1/2 teaspoon of the lemon juice. Season with salt and pepper, and refrigerate.
In a large, shallow dish, mix the olive oil with the remaining 1 1/2 teaspoons of lemon juice. Season the swordfish with salt and pepper and turn the fish in the olive oil mixture. Refrigerate for 15 minutes.
Grill the swordfish steaks over high heat until nicely charred on the outside and just cooked within, about 4 minutes per side. Transfer the steaks to plates, top each with a dollop of basil-caper butter and serve right away.

This recipe is not my own. It is from Food & Wine Magazine.

Grilled Swordfish Steak served with Exotic Mushroom Risotto and Sauteed Summer Veggies.

Friday, August 10, 2012

Summer Salsa Lime Chicken

So here is the story behind this dish.

While dining at a restaurant, that I shall not mention, they have a dish called Fiesta Lime Chicken. It was good but not great. After making a huge batch of my Summer Salsa, I had an idea that later became this dish. It isn't that close to the restaurant dish, but was inspired by it. Over the past 4 or 5 times I've made it, little tweaks have made it into what it is now!

When making this dish, you HAVE to make it with my Summer Salsa. If you use jarred, it will taste not so well. You can find the Summer Salsa recipe on another post.

Summer Salsa Lime Chicken
Serves 2
Prep Time: 20 Min
Cook Time: 15 Min

Ingredients
For the marinade

  • 2 Tbls Olive Oil
  • Juice from 1 Lime
  • Zest from 1 Lime
  • 1 Clove of Garlic
  • Salt and Pepper
Rest of Ingredients
  • 2 Boneless Skinless Chicken Breasts
  • Shredded Colby Jack Cheese
  • Handful of Tortilla Chips, crushed.
  • Lime wedge
  • Summer Salsa (On other post)
Directions
  1. Whisk together all marinade ingredients and set aside.
  2. Pound Chicken thin to about 3/8" thick. Coat with marinade and place in refrigerator for 15 miutes.
  3. Heat grill to medium high heat. Grill chicken for 4-5 minutes on each side until no longer pink. 
  4. When chicken is done, place mound of shredded cheese on top and close lid or cover.
  5. While cheese is melting, crush a handful of tortilla chips to make a bed for the chicken to sit on.
  6. Once cheese is melted, place chicken on bed of crushed tortilla chips.
  7. Top with mound of Summer Salsa.
  8. Sprinkle chips, chicken, and Salsa with lime juice and garnish with Lime Slice.

Garlic and Lime Zest for Marinade
Marinade

Pounding out chicken.

Marinating Chicken
Grilling the chicken
Grilling the chicken on the Induction Cooktop.
Adding the cheese to the chicken.


Cover Chicken to melt cheese.


Finished dish. Served with Sauteed Zucchini and Mexican Rice.

I didn't list amounts of ingredients for the chicken because it all depends on the size of the chicken. I cover the chicken completely with cheese. Same with the salsa and the bed of tortilla chips.

Also, if you can think of a better name for this dish, let me know. I am open to suggestions.


Monday, July 16, 2012

Exotic Mushroom Risotto


If you are looking for a great side dish for a "meaty" dish, how about a risotto? Risotto can be a little time consuming but it's worth every minute of it. It's very versatile. You can add almost anything to it to change the flavor. The other day, my cousin came to visit and we made Swordfish Steaks (will be another blog post later) and he never had risotto. So we planned on that. While in the store, I saw an Exotic Mushroom Blend in the mushroom section and decided we would make Exotic Mushroom Risotto! Risotto will usually take about 20 minutes to make and you only add a little stock at a time. So it does require a little attention. But for ingredients, you can change them to your liking or what you have in the garden.


Exotic Mushroom Risotto
Serves 8
Prep Time: 5 min
Cook Time: 25 min

Ingredients:

  • 3 Tbls Butter
  • 1 Medium Shallot, chopped
  • 1 1/2 C Arborio Rice
  • 8 oz Exotic Mushroom Blend (or any kind you like)
  • 1/2 C White Wine
  • 4 C Chicken Stock
Directions:
  1. In a large saucepan, over medium heat, melt the butter.
  2. Add Shallots, saute stirring frequently until they become transluscent.
  3. Add Arborio Rice, stir frequently for a few minutes. Don't let rice brown. It will turn a different shade of white.
  4. Add Mushrooms, then White Wine.Reduce heat to a simmer.
  5. When wine is mostly absorbed with the wine, add Chicken Stock a ladle at a time, letting the stock absorb into the rice between ladles. 
  6. Once the last of the stock is added, taste to see if rice is tender. Once Stock is just about absorbed, add salt and pepper to taste and serve. Rice should be a little creamy. 
For a video of this process, check out my Youtube Video


Monday, June 25, 2012

Smoking Ribs and Pork Shoulder

The other day, my 86 year old grandfather, and my father, came out for a Father's Day feast! They wanted my Smoked Pork Spareribs and Smoked Pork Shoulder. So I figured I would take a few pictures and give everyone else some tips and tricks on smoking some mouthwatering food!

People argue all the time about whether to use Barbecue Sauce or not. I personally don't when I use my own home-made rub. Now, I give out a lot of recipes, but my "Wimpy's BBQ Rub" is one that I keep locked away in a vault. Sorry, I just won't. But I will show you how I make ribs and shoulder.


Secret Rub 

Secret Rub


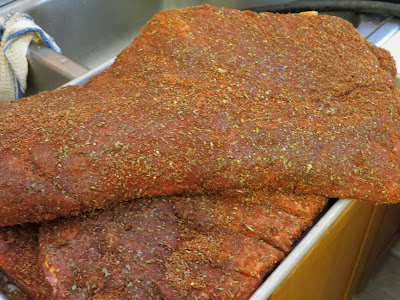
Finished Secret "Wimpy's BBQ Rub"
I like Spareribs because they have a lot of meat on them and the price. They are cheaper than back ribs. When you get them, they will have a little flap on the back of the rack. I cut that off (See picture below) and keep it as it turns into a tasty little snack about halfway through!
Removing the little "flap" on the back of the Spareribs.
Also, on the back, is a translucent skin that if possible, needs to come off. No matter how long you cook that, it will never be edible. Also, the smoke can't penetrate the meat if you leave it on. The trick is to get under it in a corner and try to peel it off. It is very slippery and sometimes a paper towel helps with grip. At any rate, try your best to get it off.
This is the silver skin you want to remove.
Just before you coat the ribs or shoulder with rub, cover it in plain old yellow mustard. It will help the rub stick to the eat a lot better and once cooked, you won't even taste the mustard.
Rubbing on the mustard.

Rubbing in the Rub.
Be very liberal with the rub and make sure every square inch, nook, and cranny is covered with it.
How it should look when done rubbing.

They are going to have a nice bark.
You can use a variety of wood to smoke with. My dad happened to have Apple so that is what I used this time. Others that are good with pork are Oak and Cherry.
This is the Apple branches we chopped and soaked.
If you've never used a chimney starter, you don't know what you are missing! This will give you red hot coals in about 10 minutes. All you do is stuff about 2 pieces of newspaper in the bottom, fill the top with lump charcoal, and light the newspaper. It's that easy!
Getting the Chimney ready.
Putting the ribs and shoulder on the smoker.
For pork, try and keep the temperature in the smoker at 225*F. Both the ribs and the shoulder will smoke for about 6 hours. If you have a digital thermometer that is oven safe, place it in the shoulder, without touching bone, and smoke it until it reaches 200*F. Then let it sit, covered, for about 30 minutes and then shred.
3 Racks of Ribs and 2 Shoulders.
I like to mist with Apple Juice every so often while smoking. Adds flavor and moisture.
Misting with Apple Juice.

Showing the smoke.

Almost done.
Remember to let the ribs sit for about 10-15 minutes after you pull them off the smoker. If you cut right into them, the juice will just run out and they will become dry.
The finished Ribs.
The Pinkish color around the outside perimeter of the meat is called the "Smoke Ring".
Finished Pork Shoulder.
So yummy!

One shoulder was shredded for Pulled Pork.

This is really just a basic intro to the world of Smoking. If you want to learn more, let me know. All in all, everything turned out pretty tasty.


Sunday, May 6, 2012

Mexican Rice

Mexican Rice is a great side dish for anytime. Even better when making tacos! I adapted this recipe from one I found on www.allrecipes.com.

Mexican Rice
(Makes about 3 Cups)
Prep Time: 5 min
Cook Time: 20 min

Ingredients

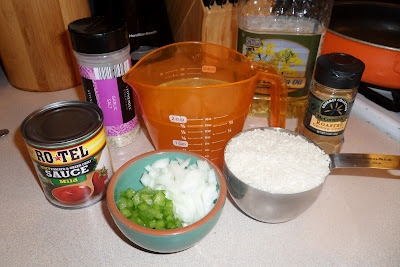
  • 1 Cup Uncooked Long Grain Rice
  • 3 Tablespoons Canola or Vegetable Oil
  • 1 8oz Can of Ro-Tel Tomato Sauce
  • 1/4 Cup Onion, Small Dice
  • 1/4 Cup Green Pepper, Small Dice
  • 1 3/4 Cup Chicken Broth
  • 1 teaspoon Roasted Ground Cumin
  • 1 teaspoon Garlic Salt
  • Salt and Pepper to taste
Directions
  1. In a medium saucepan over high heat, add the Canola oil. Let oil get nice and hot. 
  2. Add rice. Stir frequently and try not to let it brown. 
  3. After about a minute, add onion and peppers. 
  4. The rice will eventually change from looking translucent to a very white. At this point, add the cumin and garlic salt, stirring constantly.
  5. When that is mixed in, add the tomato sauce and chicken broth. It will boil almost immediately. Stir, cover with lid, and turn heat to low to just simmering. 
  6. Simmer for 20 minutes or until all liquid is absorbed. 


Here are the ingredients.


The rice before it's cooked in the oil.

It will get a white appearance and not be translucent.

The finished rice.
The method of cooking rice before you simmer it is called the pilaf method. You could use different ingredients and make regular rice pilaf or even change them up and make something totally different and unique. However you do it, it is still called the pilaf method.


Wednesday, May 2, 2012

Smoked Gouda Chicken Cordon Bleu

My wife's favorite cheese is Gouda. Especially Smoked Gouda! So when I wanted Chicken Cordon Bleu one night, using Smoked Gouda was our compromise. Needless to say, it turned out Amazing! Here is how I made it.

If you have a full service meat department at your local grocer or a butcher, get your chicken breast from them and have them run it through the "Cuber" or "Tenderizer" once. It will thin it out and make it nice and tender. If you don't have someone that can do that, you can either buy thin chicken breast or pound them out yourself with a meat mallet. Lucky for me, I work at a grocery store in the meat department that has such a machine.

Also, in the pictures, I show a large chunk of Smoked Gouda. As I found out in the end result, it was a little too large and didn't quite melt all the way. So when cutting the cheese, try not to use such a large chunk. Maybe about 1/4" thick. I went about 1/2". Plus, you don't want too much cheese. Smoked Gouda is a rather strong cheese and you don't want it to overpower your Chicken.

Smoked Gouda Chicken Cordon Bleu
(Serves 2)
Prep Time: 10 min
Cook Time: 20-30 min

Ingredients

  • 2 Large Boneless Skinless Chicken Breasts, ran through cuber (See note above.)
  • Smoked Gouda (How much depends on how cheesy you want it. See note above.)
  • 2 Thin Slices of Ham from the Deli (Again, your preference of Ham.)
  • Italian Style Panko Bread Crumbs for coating.
  • Olive Oil Spray


Directions

  1. Preheat oven to 375 degrees.
  2. Layout ham and place chunk of Gouda on one end.
  3. Fold ham around cheese to make a sort of "packet".
  4. Lay out chicken breast, silver side up. Silver side has a silvery look to it. Tender side should be on bottom. 
  5. Place ham and cheese "packet" on widest of chicken breast.
  6. Roll chicken around ham and cheese, tucking in sides as you go. See pictures for help.
  7. Spray Chicken and a cookie sheet with olive oil spray.
  8. Roll Chicken in bread crumbs and place on the cookie sheet.
  9. Bake for 20 minutes or until chicken is done and cheese is melted. Try not to overcook the chicken.


Start of ham and cheese "packet".


Ham and cheese "packet".


Placing the "packet" on the chicken.

Rolling the chicken around the "packet".

Spray this with olive oil spray for the bread crumbs to adhere.

Coating with bread crumbs.

Place on cookie sheet.

Cooked and ready to eat.


These are easy to make and are a great meal. I served it with my Prosciutto Wrapped Asparagus. That recipe is on here also! Please let me know how yours turned out.